 I have seen many of the users hunting around on the web for a straight forward way to configure Nokia Messaging on their Nokia E72. I was also one of them as well. I discussed with a lot on the issue that I am not able create/add a Nokia Messaging account successfully on Nokia E72. I also found many small or a bit longer tutorials to make my self able to use Nokia Messaging on Nokia E72 but they never worked for me. This is not like that they also didn’t work with others as well, they didn’t work with me atleast.
Before getting ahead towards a process which did the job for me, I would like to add some of others which I tried with no luck.
Jump to Trick 3 for a working solution
Trick 1 – Setup from phone
(It didn’t work for me on Nokia E72 but worked on Nokia E52)
– I tried to initiate the process of creating/adding email account right from the phone using built-in Email Client or using Phone Setup. It always stopped right after or in between validating the email address I used to connect with, if no valid access point was reached by the Client. And if it got connected to an access point it only could create a Manual Mailbox which will not be connected with Nokia Messaging service and need to be synced manually all the time. There will be nothing like what you call “Push Email”. So it’s not the solution we are talking about here.
Trick 2 – Setup from web and from the phone separately
(It also didn’t work on Nokia E72 but worked on Nokia E52)
– Registered on the Nokia Messaging website (http://email.nokia.com/account) on your PC by following some easy steps (web setup part would be discussed fully in the later trick). But I, some how, missed a very last step all the time when the Nokia Messaging system used to send an SMS to the mobile number that was provided during the setup. I just missed or ignored that SMS on the phone, and tried to follow many of the tutorials by continuing the setup on the phone after the part on the web was done. Continuing parts on the phone were just same as the trick 1 above. Because it was said in many posts that it gets easy for the Nokia Email Client on the device if the account has been setup already via web. Built-in Email Client then just verifies the account and set it up on the device. But the same process also got failed on my Nokia E72. It again just created Mailbox with manual delivery without contacting Nokia Messaging.
I don’t blame others because it’s quite possible that it would have worked for some individuals. Also as I mentioned in headings above which are saying that both of the ways were good to work on Nokia E52. Yes! I have setup Nokia Messaging on Nokia E52 with both of above ways and they worked good. But I always got trouble while setting up a Nokia Messaging account on Nokia E72. So once I just followed the steps starting from the web without skipping the SMS part. Following are the steps with screenshots.
Trick 3 – Setup from from the web
(worked on both Nokia E72 and on Nokia E52)
– I tried the way on both Nokia E52 and Nokia E72 and it did work. I believe it won’t disappoint on any other newer devices with built-in Email Client and are capable of receiving a Service SMS with Email settings.
Before starting the following procedure (with an email account), it’s to make sure that the email address you are going to use now has not already been registered with Nokia Messaging Subscription/Account.
– If you have, in past, used that email address as an additional email account with a Nokia Messaging Account, you would need to delete that email address from that Nokia Messaging Account.
– Or if you have, in past, used that email address to sign up for a Nokia Messaging account, you would need to cancel that Nokia Messaging Subscription/Account. And before canceling the subscription make sure you delete all of the additional email addresses it has.
On the Device: Make sure that you delete all the email accounts from the phone before starting the following following procedure.
– This is when you don’t see any Mailbox in the Email Client.
The process starts below
Step-1
 In your PC browser, visit Nokia Messaging website to create a new account at http://email.nokia.com/account and go for Sign up link.
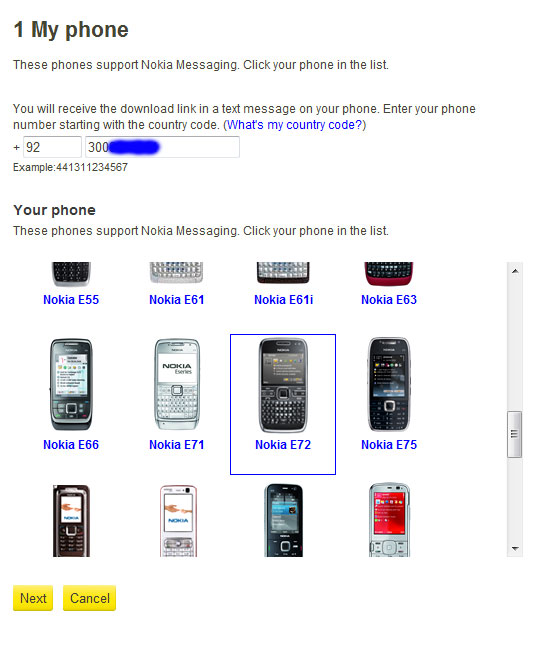
1- Provide your correct mobile number which is currently active in your device which you are going to setup now. It will only be used to send you an SMS.
2- Select your device that you want to set up Nokia Messaging for.
3- Click Next.
Step-2
 The email address and password you provide at this step, will be used by Nokia Messaging to connect to your actual mailbox account. So you would need to provide the current password of your mailbox. In addition this will be your Nokia Messaging account and you will use this information to log in at Nokia Messaging website later.
e.g. If you want to create a Nokia Messaging account with one of your Google Mail account then you would need to provide your Google Mail address ([email protected]) and the Password which you use to sign-in at Google Mail.
Step-3
 At Step-2, if Nokia Messaging successfully connects to your Mailbox you will be almost near to done on website. At the step-3, you only need to give a name which will be used in from address when you want to send emails from this account.
Just check your detail and click “Create account”.
Step-4
 Once you see the screen as shown in the screenshot, you are done on the website. But just read carefully. You will receive an SMS on your device. The SMS part is actually critical for some devices. The devices, which have in-built Email Client application, will receive an SMS that will open automatically on arriving and will start a wizard with predefined settings.
Continue Step-5 on your device. The device I used to demonstrate is Nokia E72. The same instructions are applied for Nokia E52 as well.
Step-5.
 Screen 1
If you miss this wizard or ignore and press Exit you won’t be able to see the SMS back in your inbox. So be careful specifically if you are also on Nokia E72.
Before pressing “Start” make sure that Data Connection is available and valid Access Point is preset already. You can choose “Home” button to hide the wizard and check with the required things. And come back to the wizard by pressing and holding down the “Home” button. You will see a pop up with running applications and you have to choose the Application Icon with “@” sign on it.
OK Press “Start” Now
 Screen 2
Now wait and see what happens onwards. Screenshots are attached for your reference.
You must see an Active Data connection as appeared in the screenshot near the signal bars. The message on the screen should change to the one as appeared in next screenshot.
 Screen 3
Just wait for a couple of seconds.
You should see it creating mailbox for you.
Step-6.
 Screen 4
OK! you have to give same password which you have signed up with on the website during the Step-2. Make sure you give the correct same password.
 Screen 5
That’s all. You have done your part. The mailbox should be loaded with in a couple of seconds and you should receive a welcoming email from Nokia Messaging Team as appeared next.
 Screen 6
This is the email which I received on my Nokia E72. But it is possible that you won’t receive the same email if you are not on Nokia E72.
Currently according to what some blogs and forums say, and also on Nokia Discussions this is informed that Nokia E72, E75, and E55 are shipped with the full subscription of Nokia Messaging. You might receive another email explaining some thing like a Trial Subscription of Nokia Messaging instead of this one. There are some other models including E52, which are having some kind of confusion with Full and Trial subscription. At this stage you should leave that.
One other thing that I haven’t mentioned in the whole process above. Following is the screenshot from the account page at Nokia Messaging website after when you log in. Remember that the subscription plan will be shown as “Nokia Messaging Trial” until you perform all steps on your device.

Once you have completed the steps as explained above on your device and have received the email from Nokia Messaging like the one attached above in Step-6, Screen 6 the subscription plan on your account page should change to some thing like below. And also the Subscription status would be added as “Active”.

Also remember that the Subscription plan will be changed to “purchased with device” only if your device is having full subscription in bundle. You should know that after reading the email carefully you receive from Nokia Messaging. If your device is not having full subscription then your Nokia Messaging account will remain with a Trial active subscription as shown below. But don’t worry. You would still enjoy the service at its full. The trial doesn’t have any defined limit. I had been using it as Trial on Nokia E52 for months and it’s still great with no limit

I hope the post would have helped you. Please comment and ask any thing you are not good with.
Update: Remember that, your Nokia Messaging account will be canceled instantly on server (and shortly your device will not able to connect to the server) if you change the SIM card in your device.
The Nokia Messaging service is actually based on both the SIM Card identity and The Device identity. e.g. Once you have signed up with Nokia Messaging using SIM-1 on Device-1. The Device-1 will be bound to the SIM-1 on Nokia Messaging server. Removing the SIM-1 and inserting the SIM-2 will cause your Nokia Messaging Subscription to be canceled.
Reason: It’s due to keeping the account safe in case of the resale or transfer of ownership of the device. Currently Nokia Messaging service uses this technique to detect if the device has been with another person identifying another SIM card in the device.
Recommendation: If you plan to change a SIM card in your device. Then to keep your account usable with Nokia Messaging later or with the new SIM card, you should delete all the mailboxes from the device, you have added into Nokia Messaging account. And then cancel the Nokia Messaging subscription from http://email.nokia.com/ manually. Now with the new SIM card, you can proceed again repeating the above process.